How to setup Raspberry PI as an Azure DevOps agent
- Posted in:
- Azure
- IoT Edge
- Raspberry PI
- DevOps
You may wonder why this question even raised? Why we have to do something such a weird thing as to add Raspberry PI as an Azure DevOps agent?
Azure DevOps have plenty of agents for different OS-s to build and deploy solutions for Windows, Linux and mac-s.
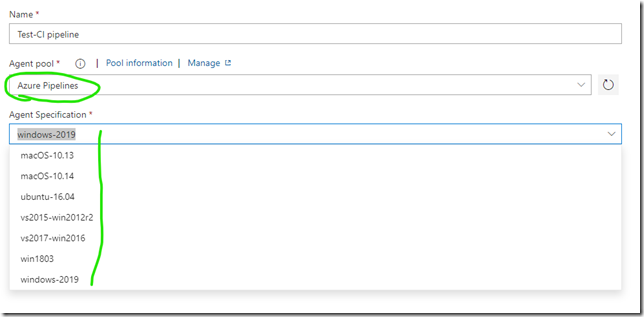
Can I set up CI/CD pipeline for Raspberry?
No by default!
By default Azure DevOps doesn’t have an option to build a solution for Raspberry.
I couldn’t find complete instructions to do this so I created one.
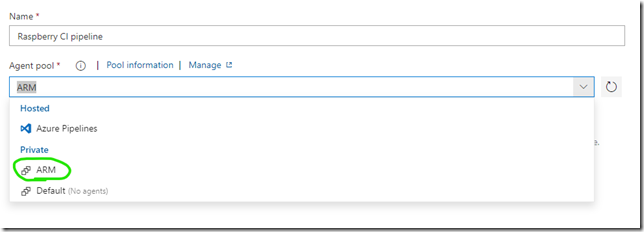
To set up build pipeline for Raspberry we have to build Raspberry as a self-hosted agent for Azure DevOps.
After completing all the steps below you can create a fully automated CI/CD pipeline for your IoT Edge device based on Raspberry PI.
This is all SUPERCOOL !
Please be patient and follow all the steps below. It takes more than 1 hour of your time.
Ok, let’s rock with the Raspberry.
Step 1. Install Raspbian-strech /10min
This step is explained in another article so I am not going to repeat the story here. Please follow the instruction here.
#1 Installing Linux(Rasbian-stretch) on Raspberry PI
Step 2. Install prerequisites /4min
If you are smarter than me then you probably know why all this stuff needed.
sudo apt-get install python3-setuptools python3-dev build-essential tk-dev libncurses5-dev libncursesw5-dev libreadline6-dev libdb5.3-dev libgdbm-dev libsqlite3-dev libssl-dev libbz2-dev libexpat1-dev liblzma-dev zlib1g-dev libffi-dev -y && sudo easy_install3 pip
Step 3. Install Python 3.7 /13min
1. Download and install Python. More information: https://gist.github.com/SeppPenner/6a5a30ebc8f79936fa136c524417761d
wget https://www.python.org/ftp/python/3.7.4/Python-3.7.4.tar.xz && tar xf Python-3.7.4.tar.xz && cd Python-3.7.4 && ./configure && make -j 4 && sudo make altinstall && cd ..
2. Make Python 3.7 as default python version. More information: https://raspberry-valley.azurewebsites.net/Python-Default-Version/
sudo update-alternatives --install /usr/bin/python python /usr/bin/python2.7 1 && sudo update-alternatives --install /usr/bin/python python /usr/local/bin/python3.7 2
Step 4. Install Azure CLI tools /18min
More information: https://docs.microsoft.com/en-us/cli/azure/install-azure-cli-linux
Just push enter when the script asks for the default installation directories (twice in the beginning of the script) and paths (twice in the end of script).
curl -L https://aka.ms/InstallAzureCli | bash && exec -l $SHELL
Step 5. Install the IoT Edge runtime /2sec
More information: https://docs.microsoft.com/en-us/azure/iot-edge/how-to-install-iot-edge-linux
curl https://packages.microsoft.com/config/debian/stretch/multiarch/prod.list > ./microsoft-prod.list && sudo cp ./microsoft-prod.list /etc/apt/sources.list.d/ && curl https://packages.microsoft.com/keys/microsoft.asc | gpg --dearmor > microsoft.gpg && sudo cp ./microsoft.gpg /etc/apt/trusted.gpg.d/
Step 6. Install the Moby container runtime /4min
More information: https://docs.microsoft.com/en-us/azure/iot-edge/how-to-install-iot-edge-linux
Just push enter when the script ask for the default installation directory.
sudo apt-get update && sudo apt-get install moby-engine && sudo apt-get install moby-cli
Step 7. Install IotEdgeDev tool /15min
More information: https://github.com/Azure/iotedgedev/wiki/manual-dev-machine-setup
sudo pip3 install -U iotedgedev
Step 8. Create an agent pool /2min
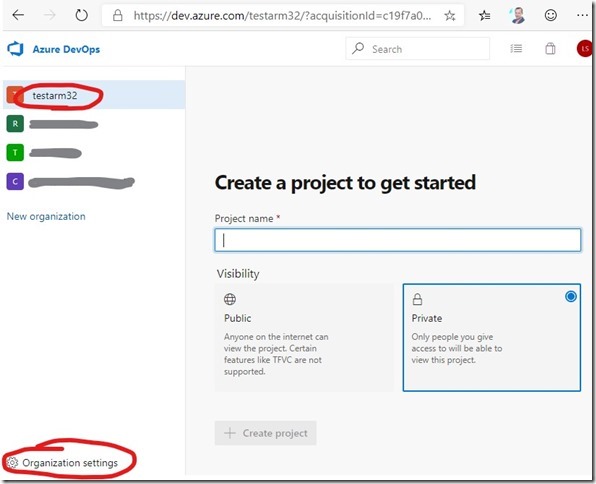
Now it is time to switch into Azure DevOps portal and make some configurations here. Go to your https://dev.azure.com portal and open organization.
1. Open organization settings
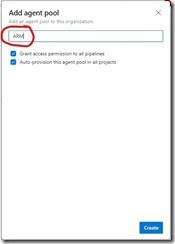
2. Add new agent pool
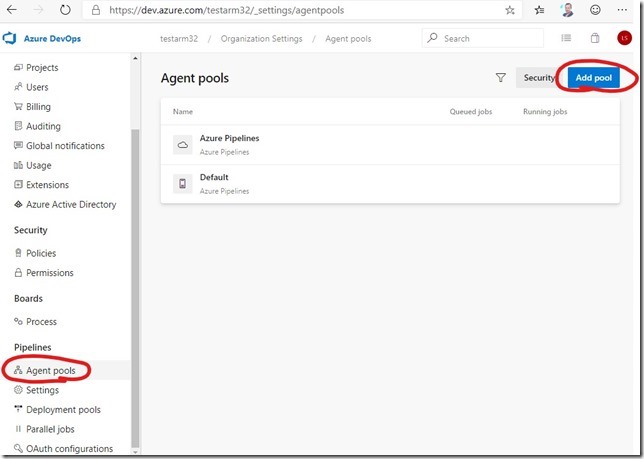
3. Name it ARM
Step 9. Create Personal Access Token (PAT)
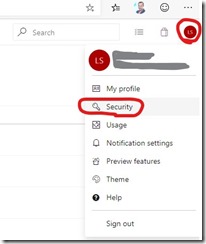
1. Click on your name in right corner and open Security.
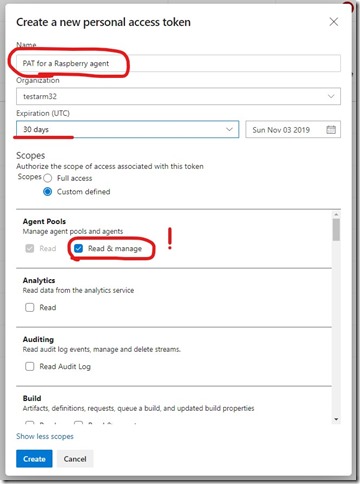
2. Fill out the PAT form
Enter the name for the token. Put some meaningful name for it to remember later the reason you created it.
For the scope select Agent Pools (read, manage) and make sure all the other boxes are cleared. If you don’t see it just click below the link “Show more scopes”.
3. Copy the PAT
Warning - Make sure you copy the above token now. You will not be able to see it again.
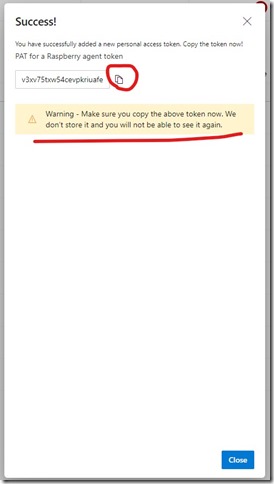
v3xv75txw54cevpkriuafeawojmhqsibp4anxamtgyfr4zqt2ygq
Step 10. Configure Raspberry as an agent /3min
This script will download ARM template and configure Raspberry as an Azure DevOps hosted agent.
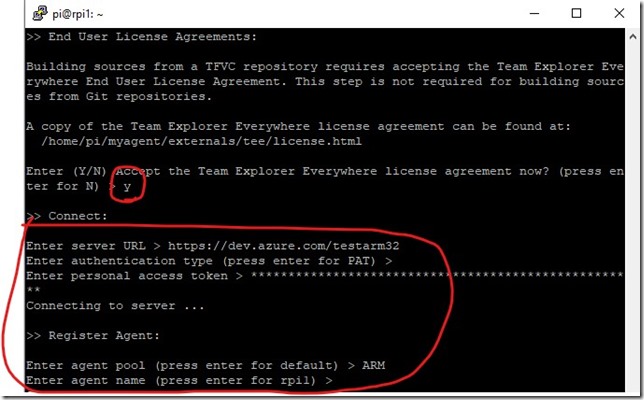
This script asks some questions during agent configuration.
wget https://vstsagentpackage.azureedge.net/agent/2.158.0/vsts-agent-linux-arm-2.158.0.tar.gz && mkdir myagent && cd myagent && tar zxvf ../vsts-agent-linux-arm-2.158.0.tar.gz && ./config.sh && sudo ./svc.sh install root && sudo ./svc.sh start && cd ..
- Accept license terms: y + enter (do not just push enter as this equals No)
- Server URL: https://dev.azure.com/testarm32 (your organization URL)
- Your copied PAT: v3xv75txw54cevpkriuafeawojmhqsibp4anxamtgyfr4zqt2ygq
- Agent pool: ARM
- Agent name: just push enter
Optional: You may want to change the command if there are never ARM-template available. On that case just update all the version numbers in the command.
To check never version of ARM template then open the agent pool in DevOps portal.
- Click New Agent
- Select Linux
- Select ARM
- Copy the download link (do not download this file into your PC, you don’t need it).
Finally you are done after 1h 10min!
You have now Raspberry PI configured as a self-hosted agent in Azure DevOps. For next step you can create a fully automated CI/CD pipeline for your Raspberry PI projects.
This is explained very well here by Microsoft: https://docs.microsoft.com/en-us/azure/iot-edge/how-to-ci-cd
Check the new agent in the Azure DevOps portal.
